
I have focused a lot on writing code to keep it maintainable and ensure it has a long lifespan. Certain coding principles help to achieve that and we’ve covered some of them in the course. Today I want to look at something that firebase provides that helps us improve and ensure that the product our code delivers is in a great condition as well. Metrics (Tracking what the user does) and Analytics (the analysis of what the users did) is one step towards achieving a better end product.
Today we will go over how to integrate Firebase analytics, event tracking and user properties to ensure we know what the users are doing in our app. This will help us make better decisions around future updates and existing functionality. I will be using this project which is the code from the previous tutorial on push notifications
Firebase Analytics
Firebase has some great basic analytics that you get for free simply by adding the framework to your app. Lets start by adding the package to our project and setting up our service that we’ll use for tracking.
Setup
Our project is already setup for Firebase interaction. If yours is not please follow along with Part 1 where we do Android setup and authorisation. In this tutorial we’ll add the new package and then make use of it. Open up your pubspec file and add the analytics package.
firebase_analytics: ^5.0.11Under the services folder create a new file called analytics_service.dart. Inside we’ll have an instance that we’ll use for the analytics in this session as well as a function that return an AnalyticsObserver which will be used to track routes.
class AnalyticsService {
  final FirebaseAnalytics _analytics = FirebaseAnalytics();

  FirebaseAnalyticsObserver getAnalyticsObserver() =>
      FirebaseAnalyticsObserver(analytics: _analytics);
}
Register the analytics service with the locator.
locator.registerLazySingleton(() => AnalyticsService());That’s all the setup. So the first thing that can easily be tracked is Screen Views.
Tracking Screen Views
See the FirebaseAnalyticsObserver, that automatically tracks your views when supplied as one of the navigatorObservers in your material app. Internally it checks for the name of the route being navigated too on the navigationSettings parameter and logs that as your screen name. Open your main.dart file and add the analytics observer as one of the navigatorObservers.
class MyApp extends StatelessWidget {
  @override
  Widget build(BuildContext context) {
    return MaterialApp(
      title: 'Compound',
      navigatorObservers: [
        locator<AnalyticsService>().getAnalyticsObserver(),
      ],
      ...
    );
  }
}
Your views will now be tracked, IF, you use named routing. If you don’t then you have to make a small adjustment everywhere you navigate directly to a route. You have to supply the name of the route where you navigate like below.
Navigator.push(
    context,
    MaterialPageRoute(
      builder: (context) => HomeView(),
      settings: RouteSettings(name: 'HomeView'),
    ),
  );
}
You have to do that for every navigation you do if you’re not using named routing. Once you’ve done that you’ll get all your page views. If you want to see your analytics / events while you’re debugging you can go to the DebugView in your firebase console app. To ensure that your debug info is being sent up to the console you have to run
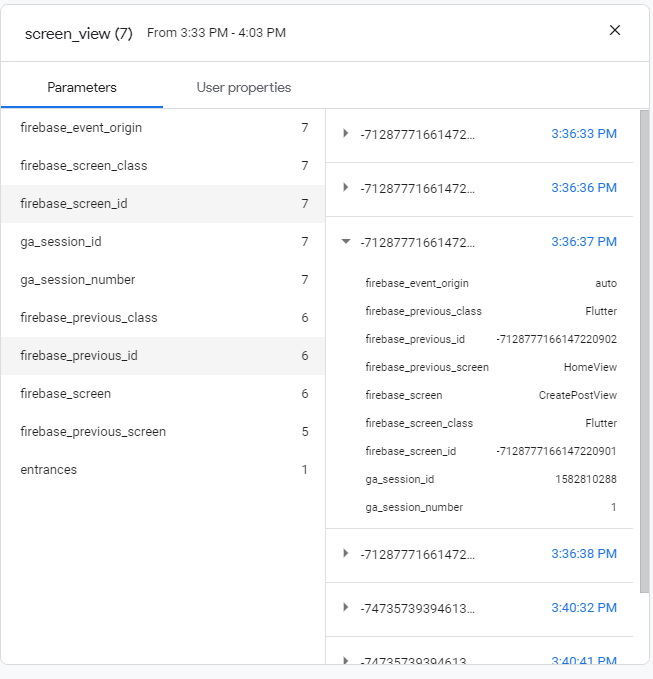
adb shell setprop debug.firebase.analytics.app [yourapp.package.id]Run the app, navigate around for a while and then view the information by refreshing the view. You’ll see screen_view events and when you click on it you’ll be able to drill down and see which view you came from and the view you were going too.
User Tracking and Properties
Before we get to the custom event tracking we want to ensure we know what user is sending those events and any other important properties they might have. That’s where user properties come in. The first thing built into firebase analytics is the user id tracking. This will associate all the events fired with this user. Open the analytics_service and add a new function.
class AuthenticationService {
  ...
  Future setUserProperties({@required String userId}) async {
    await _analytics.setUserId(userId);
  }
}
Now you can set the userId in your app wherever you have it. We will be making it automatic so we’ll set ours in the AuthenticationService. Open up the AuthenticationService, get the analytic_service from the locator, then call the setUserProperties in the _populateCurrentUser function as well as after the createUser call in the signUpWithEmail function.
class AuthenticationService {

  Future signUpWithEmail({
    @required String email,
    @required String password,
    @required String fullName,
    @required String role,
  }) async {
    try {
      var authResult = await _firebaseAuth.createUserWithEmailAndPassword(
        email: email,
        password: password,
      );

      _currentUser = User(
        id: authResult.user.uid,
        email: email,
        fullName: fullName,
        userRole: role,
      );

      await _firestoreService.createUser(_currentUser);
      // set the user id on the analytics service
      await _analyticsService.setUserProperties(userId: authResult.user.uid);

      return authResult.user != null;
    } catch (e) {
      return e.message;
    }
  }

  Future _populateCurrentUser(FirebaseUser user) async {
    if (user != null) {
      _currentUser = await _firestoreService.getUser(user.uid);
      // set the user id on the analytics service
      await _analyticsService.setUserProperties(userId: user.uid);
    }
  }
}
The other thing we want to track is the user role. This will be set to our admin / user values that we select in the app. Update the setUserProperties function in the AnalyticsService to take in the userRole as well.
class AuthenticationService {
  ...
  Future setUserProperties({@required String userId, String userRole}) async {
    await _analytics.setUserId(userId);
    // Set the user_role
    await _analytics.setUserProperty(name: 'user_role', value: userRole);
  }
}
By convention the user properties and event names are split by underscore and not camel case. We set the user property user_role equal to the role passed in. Then go to the Authentication service and pass in the user role where we call the setUserProperties function.
 await _analyticsService.setUserProperties(
   userId: authResult.user.uid,
   userRole: _currentUser.userRole,
   );
Last thing to do when adding a custom user property is to tell firebase about it. Open up the firebase console and click on the User Properties item under the analytics section in the left toolbar. Click on the “Create your first user property” button and enter user_role as the key and “The role of the user assigned as they register a profile” as the description. It should look like this when you’re done.

Custom events
The next, and probably more appealing functionality that analytics provide is the ability to log your own events when you want it. To put the explanation in simple terms, the user properties define who and what a user is while events define what a user does. FirebaseAnalytics provide you with a lot of custom events to log from addToCartEvent up to levelUp events for games. They cover quite a lot so you can pick and choose what you want from there. One way to get the most out of analytical events is to ask yourself which 5 - 10 events in your app are important to you to be able to determine what to change and how the app is used.
In this scenario we want to know, how many users signed up as admin, those that signed up as users how many posts did they create, update and delete. That sentence tells me I need to track the following events.
- When a user logs in.
- When a user signs up and what role they chose.
- When a user successfully creates a post and if they posted with an image or not.
I’m not going to do every event because you’ll see how repetitive it is, you’ll be able to add the rest easily following the same pattern.
Login Event
On the analytics service make a new function called logLogin
Future logLogin() async {
  await _analytics.logLogin(loginMethod: 'email');
}
Open up the LoginViewModel and get the analytics service. Before we navigate to the HomeViewRoute after the login succeeds we’ll log a successful login.
class LoginViewModel extends BaseModel {
  final AnalyticsService _analyticsService = locator<AnalyticsService>();

  Future login({
    @required String email,
    @required String password,
  }) async {
    ...
    if (result is bool) {
      if (result) {
        await _analyticsService.logLogin();
        _navigationService.navigateTo(HomeViewRoute);
      } else {
       ...
      }
    }
  }
}
Sign Up Event
On the analytics service add a logSignUp event function.
Future logSignUp() async {
  await _analytics.logSignUp(signUpMethod: 'email');
}
Open up the SignUpViewModel, import the analytics service and call logSignUp after a successful login.
class SignUpViewModel extends BaseModel {
  final AnalyticsService _analyticsService = locator<AnalyticsService>();

  Future signUp({
    @required String email,
    @required String password,
    @required String fullName,
  }) async {

    if (result is bool) {
      if (result) {
        await _analyticsService.logSignUp();
        _navigationService.navigateTo(HomeViewRoute);
      } else {
        ...
     }
    }
  }
}
Post Created Event
In the analytics service create a new post called logPostCreated.
Future logPostCreated({bool hasImage}) async {
  await _analytics.logEvent(
    name: 'create_post',
    parameters: {'has_image': hasImage},
  );
}
Open the create post viewmodel and after creating a new post we call this function.
class CreatePostViewModel extends BaseModel {
  final AnalyticsService _analyticsService = locator<AnalyticsService>();

  Future addPost({@required String title}) async {
     if (!_editting) {
      result = await _firestoreService.addPost(Post(
        title: title,
        userId: currentUser.id,
        imageUrl: storageResult.imageUrl,
        imageFileName: storageResult.imageFileName,
      ));

      // Log the post created and check if the image is null
      await _analyticsService.logPostCreated(
          hasImage: _selectedImage != null);
    } else {
      ...
    }
  }
}
Those are all the ones I’ll cover. This is literally the beginning of analytics, we would need an entire series to cover everything that can be done and how it can be used to track user functionality. I wanted to cover the implementation how I do it in my apps and that’s it. Thanks for reading, make sure to check out the full course here and come back next week for the new tutorial :)
- Dane Mackier