
In part 2 of the Firebase and Flutter series we will be adding custom start up logic, user profiles and making sure it’s available everywhere from start. Here’s a bit more details of each of them.
- Custom Startup Logic: When a user has logged in already we want to make sure they go directly to the HomeView instead of the Authentication Views.
- User Profiles: When a user signs up we will capture their full name and user role (just as an example) along with the identification properties.
- Make sure user is available throughout the app: Usually an api / backend service would provide you with data based on a user’s id or authentication token. This means that everywhere in the app (almost every view) we will need to have the User’s information at hand. We’ll add the code to make that possible.
We’ll start off with the Custom Logic
Custom Startup Logic
This is one of those questions I see many people ask about and it’s actually a small amount of code to get it right. This is how we’ll implement it.
- When the app starts up we’ll always show a
StartUpView. - In the initialisation code for this view we will check if there’s a firebase user on disk
- If there is we’ll navigate to the
HomeView - If there’s no user we’ll navigate to the
LoginView
Let’s get going. Download the starting project here if you didn’t follow along. You can also do this in your own firebase project.
Implementation
Under the views folder create a new file called startup_view.dart
class StartUpView extends StatelessWidget {
  @override
  Widget build(BuildContext context) {
    return ViewModelProvider<StartUpViewModel>.withConsumer(
      viewModel: StartUpViewModel(),
      builder: (context, model, child) => Scaffold(
        backgroundColor: Colors.white,
        body: Center(
          child: Column(
            mainAxisSize: MainAxisSize.min,
            children: <Widget>[
              SizedBox(
                width: 300,
                height: 100,
                child: Image.asset('assets/images/icon_large.png'),
              ),
              CircularProgressIndicator(
                strokeWidth: 3,
                valueColor: AlwaysStoppedAnimation(Color(0xff19c7c1)),
              )
            ],
          ),
        ),
      ),
    );
  }
}
Under viewmodels create a new file called startup_view_model.dart
class StartUpViewModel extends BaseModel {}Import the viewmodel in the view file. Open up the main.dart file and set the home value equal to StartUpView().
 return MaterialApp(
      ...
      home: StartUpView(),
      onGenerateRoute: generateRoute,
    );
If you run the code now you’ll see the app starts at a starting view with the app icon and a loading indicator. This is where we’ll do all our magic.
Check if user is logged in
Firebase Auth provides you with a current user to check. They keep track of the login status on disk so you can simply check if the user is null or not to confirm if we’re logged in. Open up the AuthenticationService and add a new function that returns a type Future<bool>.
class AuthenticationService {
  final FirebaseAuth _firebaseAuth = FirebaseAuth.instance;

  ...

  Future<bool> isUserLoggedIn() async {
    var user = await _firebaseAuth.currentUser();
    return user != null;
  }
}
When the user is null there’s no login on the current device and when it’s not there is. Simple as that. Open up the StartUpViewModel. Create a new function of type Future called handleStartUpLogic where we will … uhhhmmm … handle our startup logic :) First thing we’ll do is check if the user is logged in. If the user is we navigate to the HomeView otherwise we navigate to the LoginView.
class StartUpViewModel extends BaseModel {
  final AuthenticationService _authenticationService =
      locator<AuthenticationService>();
  final NavigationService _navigationService = locator<NavigationService>();

  Future handleStartUpLogic() async {
    var hasLoggedInUser = await _authenticationService.isUserLoggedIn();

    if (hasLoggedInUser) {
      _navigationService.navigateTo(HomeViewRoute);
    } else {
      _navigationService.navigateTo(LoginViewRoute);
    }
  }
}
This is the reason you want your navigation as a service. You can easily use it where it’s required for business logic. Same goes for anything else as a service. The final step to wrap up this functionality is to call this function when the model is ready. Open the StartUpView and call this function in the onModelReady callback.
class StartUpView extends StatelessWidget {
  @override
  Widget build(BuildContext context) {
    return ViewModelProvider<StartUpViewModel>.withConsumer(
      viewModel: StartUpViewModel(),
      onModelReady: (model) => model.handleStartUpLogic(),
      builder: (context, model, child) => Scaffold
      (...),
    );
  }
}
That’s all there is to it. Run the app now and if you’ve logged in on the device you’ll see you go directly to the HomeView. If not you’ll end up on the LoginView. To test this, remove the app from the device first, when you run again you should land on the login view. After logging in, close the app and open it up again. You should end up on the HomeView after logging in.
User Profiles
Next up we’ll ada a custom user profile. We want to store the user’s Full Name, the ID from Firebase Authentication, email, user type (Admin / User).
Firebase Console Setup
Open up the firebase project, compound, that we created. On the left side click on database. Click on Create Database, start in test mode (for now) and click on done. We will cover test rules in depth, how to set it up, test it and make sure your db is secure in a future episode. For now we need to be able to access the DB without being signed in so we can post the user’s information from the signup view to the realtime db.
The first thing we’ll do is click on Start Collection, give it the name users, give it an auto id and click save.
Code Setup
Open up the pubspec.yaml file and add the following dependency under the firebase_auth plugin.
cloud_firestore: ^0.13.0+1Then head over android/app/build.gradle file and bump the minSdkVersion from 16 to 21. That’s it for the setup.
Code Implementation
Then we’ll create a new model for the User. Go to the models folder and create a new file called user.dart. We’ll have a toJson function that we’ll use to update the firestore entry and a fromData constructor that we’ll use to serialise our firestore data into the User object.
class User {
  final String id;
  final String fullName;
  final String email;
  final String userRole;

  User({this.id, this.fullName, this.email, this.userRole});

  User.fromData(Map<String, dynamic> data)
      : id = data['id'],
        fullName = data['fullName'],
        email = data['email'],
        userRole = data['userRole'];

  Map<String, dynamic> toJson() {
    return {
      'id': id,
      'fullName': fullName,
      'email': email,
      'userRole': userRole,
    };
  }
}
Now we can move onto the SignUpView. We’ll start by adding a new text editing controller for the fullName and a new field. In the sign up view Above the Email field we’ll add another Field for Full Name with a small vertical space. We’ll also add fullName value into the call to signUp on the model.
class SignUpView extends StatelessWidget {
  ...
  final fullNameController = TextEditingController();

  @override
  Widget build(BuildContext context) {
    return ViewModelProvider<SignUpViewModel>.withConsumer(
      viewModel: SignUpViewModel(),
      builder: (context, model, child) => Scaffold(
        body: Padding(
          child: Column(
              ...
              ),
              verticalSpaceLarge,
              InputField(
                placeholder: 'Full Name',
                controller: fullNameController,
              ),
              verticalSpaceSmall,
              InputField(
                placeholder: 'Email',
                controller: emailController,
              ),
              verticalSpaceSmall,
              ...
              Row(
                mainAxisSize: MainAxisSize.max,
                mainAxisAlignment: MainAxisAlignment.end,
                children: [
                  BusyButton(
                    title: 'Sign Up',
                    busy: model.busy,
                    onPressed: () {
                      model.signUp(
                        email: emailController.text,
                        password: passwordController.text,
                      );
                    },
                  )
                ],
              )
            ],
          ),
        ),
      ),
    );
  }
}
Next up we’ll add an ExpansionList to select the user type. In the SignUpViewModel add a new String property for the selectedRole as well as a function to set the selected role from outside.
class SignUpViewModel extends BaseModel {
  ...

  String _selectedRole = 'Select a User Role';
  String get selectedRole => _selectedRole;

  void setSelectedRole(String role) {
    _selectedRole = role;
    notifyListeners();
  }

  ...
}
Then in the SignUpView we’ll add an ExpansionList under the password field with a small vertical space above it. Place the following in the column children under the Password field.
...
    verticalSpaceSmall,
    ExpansionList<String>(
      items: ['Admin', 'User'],
      title: model.selectedRole,
      onItemSelected: model.setSelectedRole,
    ),
...
If you rebuild the app now your UI should look like this.
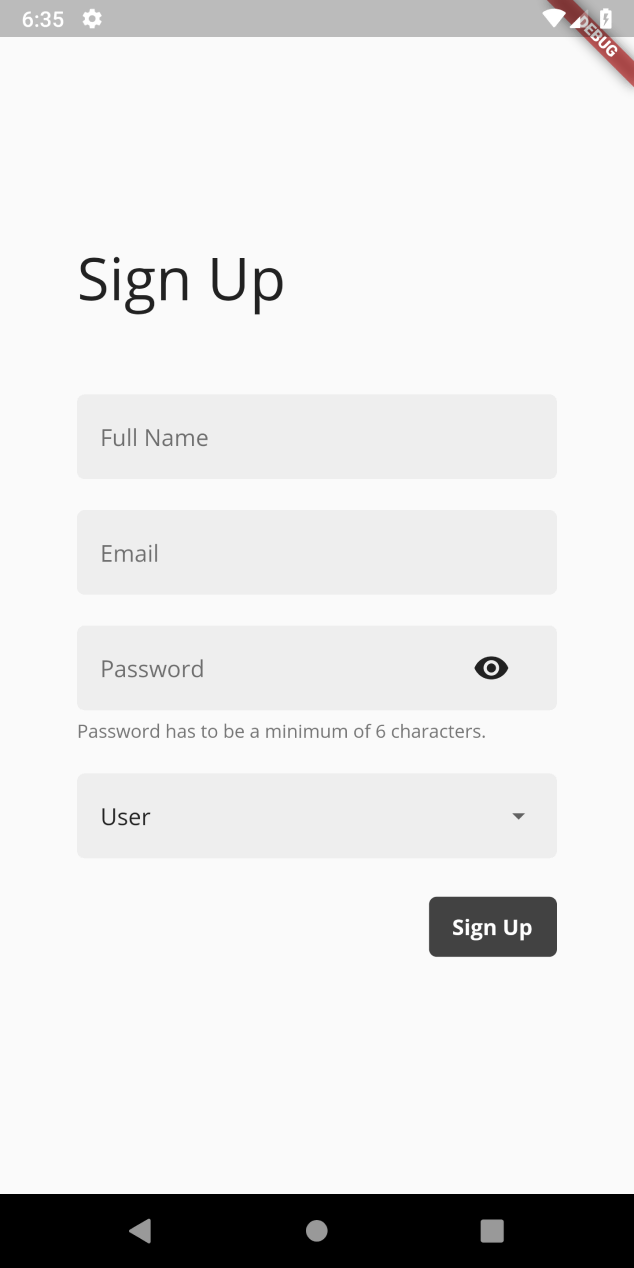
If you select the type you should see it setting to Admin or User. It won’t be used like this but it’s easier to do it this way for demo purposes. The last thing to do in this section is to update the signUp function to pass all of this the the AuthenticationService. Open up the AuthenticationServiceand add fullName and role as String parameters to the function.
class AuthenticationService {
  ...
  Future signUpWithEmail({
    @required User user,
    @required String password,
    @required String fullName,
    @required String role,
  }) async {
    try {
      var authResult = await _firebaseAuth.createUserWithEmailAndPassword(
        email: user.email,
        password: password,
      );

      // TODO: Create firestore user here and keep it locally.

      return authResult.user != null;
    } catch (e) {
      return e.message;
    }
  }
}
Back in the SignUpViewModel we update the function to pass in all the new parameters.
  Future signUp(
      {@required String email,
      @required String password,
      @required String fullName}) async {
        ...
        var result = await _authenticationService.signUpWithEmail(
              email: email,
              password: password,
              fullName: fullName,
              role: _selectedRole,
            );
        ...
  }
Now it’s time to create the FireStoreService that we’ll use to interact with the Firestore DB. Under services create a new file called FirestoreService. It’s a very simple service. We’ll keep the reference to the collection we want, create a function that takes in a user then we set that user using the id as the document id and then set the data to the .toJson function value.
class FirestoreService {
  final CollectionReference _usersCollectionReference =
      Firestore.instance.collection("users");

  Future createUser(User user) async {
    try {
      await _usersCollectionReference.document(user.id).setData(user.toJson());
    } catch (e) {
      return e.message;
    }
  }
}
Go back to the AuthenticationService, import the FirestoreService and call createUser on it.
 Future signUpWithEmail({
    ...
  }) async {
    try {
     ...
      await _firestoreService.createUser(User(
          id: authResult.user.uid,
          email: email,
          fullName: fullName,
          userRole: role));
      return authResult.user != null;
    } catch (e) {
      return e.message;
    }
  }
Last thing is to register the FirestoreService in locator.dart.
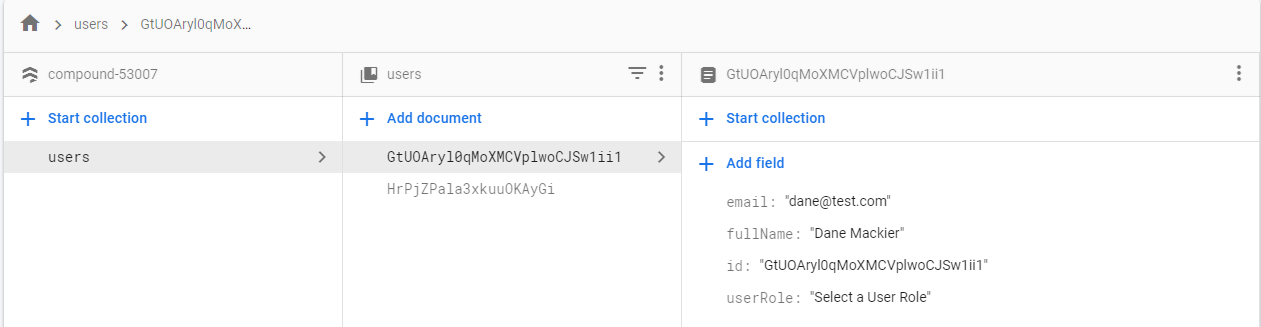
locator.registerLazySingleton(() => FirestoreService());That’s it. Remove the app from your device. Go to sign up, enter all the details, select sign up and then you’ll see the user in the DB.
User Available from Start
What I like to do in my apps is make sure that when the app is up and running, meaning after the StartUp view has been shown it know everything that might be required. For us that means we have the user profile in memory and ready for use. To achieve that we’ll build it into the AuthenticationService so that we don’t have to “manually” call it from outside. It might have looked strange when we made the isUserLoggedIn a function and not a get property. The reason for that was because I knew I was going to be introducing a side-effect later on.
That side-effect is the act of populating the currentUser that we’ll add. We’ll start by the getUser function to the FirestoreService that will fetch our user for us.
class FirestoreService {
  ...
  Future getUser(String uid) async {
    try {
      var userData = await _usersCollectionReference.document(uid).get();
      return User.fromData(userData.data);
    } catch (e) {
      return e.message;
    }
  }
}
Then Open the AuthenticationService and create a new private User variable with a getter called currentUser that will expose the private variable. In addition to that we’ll create a function that will populate this user for us. We’ll call the _populateCurrentUser function before we return the user != null check in the loginWithEmail function. We’ll do the same in the isUserLoggedIn function.
I also made a mistake in the previous code thinking the signInWithEmailAndPassword returned the user directly. It actually does also return an AuthResult type. So update the variable it’s stored in and name it authResult and for the final return use authResult.user.
class AuthenticationService {
  User _currentUser;
  User get currentUser => _currentUser;

  Future _populateCurrentUser(FirebaseUser user) async {
    if (user != null) {
      _currentUser = await _firestoreService.getUser(user.uid);
    }
  }

  Future loginWithEmail({
    @required String email,
    @required String password,
  }) async {
    try {
      var authResult = await _firebaseAuth.signInWithEmailAndPassword(
        email: email,
        password: password,
      );
      await _populateCurrentUser(authResult.user); // Populate the user information
      return authResult.user != null;
    } catch (e) {
      return e.message;
    }
  }

  Future<bool> isUserLoggedIn() async {
    var user = await _firebaseAuth.currentUser();
    await _populateCurrentUser(user); // Populate the user information
    return user != null;
  }
}
This will ensure that by the time the app gets to any meaningful view the User information is ready to use. This will be important when we want to start showing data for that user in the app which will require the user id and maybe email etc. That’s it for us. Run the code now and you’ll see everything still works fine. The only difference is that the User information is available from start.
Next week we’ll display some data from DB on the Home View and go over the firestore real time data handling, query building etc. Thank you for reading, subscribe to my youtube channel and I’ll speak to you next week!