
Welcome back to Part 3 of the Firebase Series. In this series I share the way FilledStacks App Development implements Firebase functionality for our client applications. In this part we will cover the basics of Firestore (The firebase RealTime Database). I always see beginners in Firebase asking about CRUD for Firestore so this tutorial will cover that.
If you want to follow along you can use your own project or download the starting code here. I’ve added the UI that we’ll need to implement the functionality. A basic styled home view, a FAB that takes you to the Create View and a Post Item that shows a text in the left center along with a close button icon. I also added the Post Model which is a class that contains a String property for the title and another for an image url.
Firestore Database
Firestore is a real time database that stores collections and documents. A collection stores documents and a document is made up of json. There’s no predefined data structure, you can add and remove fields as you please without having to do migration steps. It’s known as a NoSQL database. This tutorial will not cover the way you plan your database for your application or what kind of structures you should use. We already have a Users collection, we’ll add a new Posts collection where we will store the post data.
Create a Firestore Post
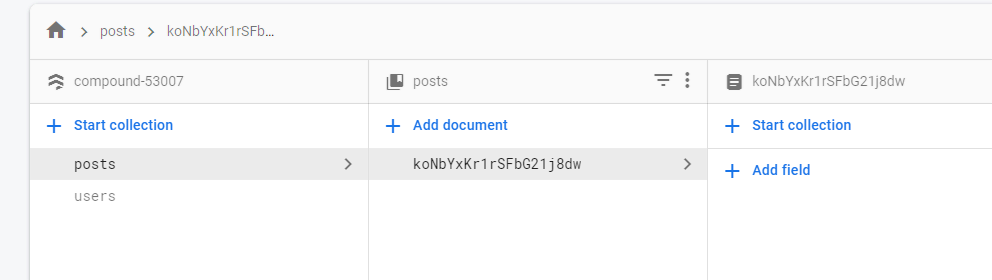
Open up the Firebase Console and go to the compound project. On the left side click on the Database icon, underneath the Authentication Icon. Add a new collection in the root column and call it posts. Choose and autoId and create the document. You should see something like below.
Then you can open up the code. Open up the FirestoreService. We’ll start by adding a CollectionReference to the posts collection at the top, then create a new function that returns a Future called addPost. In this function we will add a new document to the collection by calling the add function on the collection reference and passing it the map from the post object.
class FirestoreService {
  final CollectionReference _postsCollectionReference =
      Firestore.instance.collection('posts');

    Future addPost(Post post) async {
    try {
      await _postsCollectionReference.add(post.toMap());
      return true;
    } catch (e) {
      return e.toString();
    }
  }
}
Is usual we return the error, if any, as a string and true if the action is complete. This will allow us to distinguish between success and failure and then perform the appropriate action. Now you can open up your CreatePostViewModel. The logic we’ll have for creating a new post is as follows. We will indicate we’re busy then make the post. If the result is a String we know something bad happened so we show a dialog with the string as the description. If it’s not a string we know if passed, then we show a success dialog. When the user dismissed either of those two dialogs we navigate back to the HomeView where the user can see their new post.
class CreatePostViewModel extends BaseModel {
  final FirestoreService _firestoreService = locator<FirestoreService>();
  final DialogService _dialogService = locator<DialogService>();
  final NavigationService _navigationService = locator<NavigationService>();

  Future addPost({@required String title}) async {
    setBusy(true);
    var result = await _firestoreService
        .addPost(Post(title: title, userId: currentUser.id)); // We need to add the current userId
    setBusy(false);

    if (result is String) {
      await _dialogService.showDialog(
        title: 'Could not add Post',
        description: result,
      );
    } else {
      await _dialogService.showDialog(
        title: 'Post successfully Added',
        description: 'Your post has been created',
      );
    }

    _navigationService.pop();
  }
}
In the code above the currentUser doesn’t exist. We still have to add that. Since I know we’ll require the currentUser in almost every view going forward we will add it into the BaseModel instead of importing the AuthenticationService into every class. Open up your BaseModel. At the top we can store a reference to the AuthenticationService and expose the current user through a read only property on the BaseModel.
class BaseModel extends ChangeNotifier {
  final AuthenticationService _authenticationService =
      locator<AuthenticationService>();

  User get currentUser => _authenticationService.currentUser;

  ...
}
That’s it for our business logic. Now we have to call it from the CreatePostView and we can test. In the create post view, in the onPressed function add the model.addPost call.
FloatingActionButton(
    child: !model.busy
        ? Icon(Icons.add)
        : CircularProgressIndicator(
            valueColor: AlwaysStoppedAnimation(Colors.white),
          ),
    onPressed: () {
      // Call the function to create the post
      if (!model.busy)
        model.addPost(
          title: titleController.text,
        );
    },
  ),
If you run the code now you can test the app. Create a new account, or login with an account if you’ve already created one. If you’re using my project json file, I delete some stuff while I’m testing so if things are failing it’s probably because I removed your user details from the DB. When you’re in the app and you’re on the HomeView. Press the FAB button, Enter the title and press the FAB on the CreatePostView as well. You should see the FAB button show the indicator and then show the dialog once complete.
Read a Firestore Collection
Next up we want to read the post that we just created. With a firestore collection you can read the posts in one of two ways. You can read the posts and get real-time updates or do a once off fetch like a traditional api call. We’ll start with a traditional fetch to ease you into the idea.
Once Off Request for Data
To perform a once off request using firestore you make use of the get function on a document, collection reference or a query. Open up the FirestoreService, we’ll add a new function called getPostsOnceOff. In that function we will get all the documents from the posts collection, check if it’s empty and then serialise it to a list of Posts using the map function. Additionally we’ll filter out any item that has a null title.
class FirestoreService {
  ...

   Future getPostsOnceOff() async {
    try {
      var postDocuments = await _postsCollectionReference.getDocuments();
      if (postDocuments.documents.isNotEmpty) {
        return postDocuments.documents
            .map((snapshot) => Post.fromMap(snapshot.data))
            .where((mappedItem) => mappedItem.title != null)
            .toList();
      }
    } catch (e) {
      if (e is PlatformException) {
        return e.message;
      }

      return e.toString();
    }
  }
}
The getDocuments call will return a QuerySnapshot which contains a documents collection with all the posts in it. Open up the HomeViewModel. We’ll start by fetching the FirestoreService as well as the DialogService from the locator. Then we’ll add the posts collection that will store all the posts we want to show the user. Then we’ll add a function called fetchPosts which returns a future. This will make use of the getPostsOnceOff call on the firestore service and store the results in the postsResults. We will then check if it’s a list of Posts and set it to the posts, otherwise we’ll show a dialog with the error message.
class HomeViewModel extends BaseModel {
  ...
  final FirestoreService _firestoreService = locator<FirestoreService>();
  final DialogService _dialogService = locator<DialogService>();

  List<Post> _posts;
  List<Post> get posts => _posts;

  Future fetchPosts() async {
    setBusy(true);
    // TODO: Find or Create a TaskType that will automaticall do the setBusy(true/false) when being run.
    var postsResults = await _firestoreService.getPostsOnceOff();
    setBusy(false);

    if (postsResults is List<Post>) {
      _posts = postsResults;
      notifyListeners();
    } else {
      await _dialogService.showDialog(
        title: 'Posts Update Failed',
        description: postsResults,
      );
    }
  }
}
Open up the HomeView file and call the fetchPosts function in the onModelReady callback. Inside the Expanded child at the bottom we will also show a progress indicator or a list view depending on the posts status.
class HomeView extends StatelessWidget {
  @override
  Widget build(BuildContext context) {
    return ViewModelProvider<HomeViewModel>.withConsumer(
        viewModel: HomeViewModel(),
        onModelReady: (model) => model.fetchPosts(),
        ...
         Expanded(
          child: model.posts != null
              ? ListView.builder(
                  itemCount: model.posts.length,
                  itemBuilder: (context, index) => PostItem(
                    post: model.posts[index],
                  ),
                )
              : Center(
                  child: CircularProgressIndicator(
                    valueColor: AlwaysStoppedAnimation(
                        Theme.of(context).primaryColor),
                  ),
                ))
    );
  }
}
Run the code now. If you have a post in your collection you should see it appear on the home view after some loading. If you have no posts in your DB click on the FAB on the HomeView and add one, add the code to refresh below and then run your code again.
Refresh after adding a post
If you want to make sure your data on the HomeView stays up to date after adding a new post then it’s a quick update. In the HomeViewModel we will now await the navigateTo call that takes us to the CreatePostViewRoute. When that returns we will call fetchPosts again.
  Future navigateToCreateView() async {
    await _navigationService.navigateTo(CreatePostViewRoute);
    await fetchPosts();
  }
Open the app, login if you haven’t, add a new post, submit and when you get back to the HomeView you’ll see it there :) Easy peasy. So Firestore can be used as a “traditional once off request API style” backend as well. Next we’ll look at the realtime data fetching.
RealTime Data Updates
This is THEE feature for firestore. It’s extremely powerful but can leave some developers lost and frustrated if they’re not use to streams or don’t like to use streams. I use to be one of those developers too so I understand your frustration. That’s the reason I put the non-stream implementation above for you 😉. You can use that until you need real-time updates, but follow along and see the benefits and the code structure for WHEN you do swap over.
The Real time mindset
Using streams is not a requirement and is definitely a tool that should be used when required. It is the best way to build a real-time system. Most apps don’t require real-time functionality but in the case of a backend heavy application it actually makes things a bit more automatic. You’ll see a small example of that with this implementation we’re about to do. Lets go over how it works, how we want to handle it and then the code to do that.
With a firestore query you have to think of it like this, “I’m asking the database for this specific data, and if it changes I want the updated version of it as well”. This means the idea of a once off request has to go out of the window. You can’t do a request for the posts, get all the posts and then you’re done with the request. Instead we’ll ask for the posts, then tell the code how to handle the results when they arrive, when new results come they’ll be handled the same way. We only have to tell the code how to handle the results once then it’ll be done for the lifetime of the object that’s handling it.
How are we using this?
Our approach to this will be as follows. We will request the snapshots (data in the database as it updates) of the posts collection. The listener for those snapshots will get the data, check if there’s anything in there, convert the posts to Post models and then put that onto StreamController. We will have a local StreamController<Post> that we’ll use for this purpose. The Stream underlying that stream controller will be returned from the getPostsRealTime function. In the ViewModel using it we will register a listener for the getPostsRealTime stream and update our viewmodel accordingly. Lets get into the code. Open up the FirestoreService. We’ll add the controller of type List<Post>. Then a new function that returns a Stream called listenToPostsRealTime. Then we’ll get the snapshots of the collection and listen to that. In the handling function we do the same thing as the once off fetch but instead of returning, at the end we add the posts onto the controller. The last thing we do is return the stream underlying the controller.
class FirestoreService {

  // Create the controller that will broadcast the posts
  final StreamController<List<Post>> _postsController =
      StreamController<List<Post>>.broadcast();

  ...

   Stream listenToPostsRealTime() {
     // Register the handler for when the posts data changes
    _postsCollectionReference.snapshots().listen((postsSnapshot) {
      if (postsSnapshot.documents.isNotEmpty) {
        var posts = postsSnapshot.documents
            .map((snapshot) => Post.fromMap(snapshot.data))
            .where((mappedItem) => mappedItem.title != null)
            .toList();

        // Add the posts onto the controller
        _postsController.add(posts);
      }
    });

    // Return the stream underlying our _postsController.
    return _postsController.stream;
  }
}
Then open the HomeViewModel and we’ll add a new function called listenToPosts. We’ll call the listenToPostsRealTime function and set the incomingPosts to the posts then call notifyListeners. We’ll also remove the fetchPosts call from the navigateToCreateView function since it’ll be handled automatically based on the real time updates.
class HomeViewModel extends BaseModel {
  void listenToPosts() {
    setBusy(true);
    _firestoreService.listenToPostsRealTime().listen((postsData) {
      List<Post> updatedPosts = postsData;
      if (updatedPosts != null && updatedPosts.length > 0) {
        _posts = updatedPosts;
        notifyListeners();
      }
      setBusy(false);
    });
  }

  Future navigateToCreateView() =>
      _navigationService.navigateTo(CreatePostViewRoute);
}
Open up the HomeView and call listenToPosts in the onModelReady callback.
class HomeView extends StatelessWidget {
  const HomeView({Key key}) : super(key: key);

  @override
  Widget build(BuildContext context) {
    return ViewModelProvider<HomeViewModel>.withConsumer(
        viewModel: HomeViewModel(),
        onModelReady: (model) => model.listenToPosts(),
        ...
    );
  }
}
And that’s it. The difference now is that your data reflects the real time DB state. If you make use of the once off request you would have to add a “Pull to Refresh” functionality to your list, but with this approach you cut out all that code. Open up the DB in the console, add an item with a title and you should see it update while the app is running. Now all apps does not require this functionality and in most cases using the single fetch would work just fine. That’s if you don’t care about the data being updated in real time. We’re building a safety incident reporting app for one of our clients and when another user edits a post everyone else has to have the updated data immediately because it’s a matter of personal safety and sometimes life and death. In this case the real time DB is absolutely fantastic, but even in apps that don’t require realtime data I still use it because having the latest data always available when you use the app is great.
Delete a Post
Now it’s time to delete a post. There are two major ways you can do this using the MvvmArchitecture, I’ll only show one. You could either provide the PostItem with it’s own ViewModel then perform the delete functionality in there to remove the responsibility from the HomeViewModel. The second way is by providing a callback function to the PostItem that will fire when the user clicks the remove icon. We’ll use that function to call a delete function on the HomeModel. We’ll implement the second one because more devs are confused with what it means to “supply a callback function”.
The first thing we’ll need is to add the document id to the Post model to ensure we know which post to delete.
class Post {
  final String title;
  final String imageUrl;
  final String userId;
  final String documentId;

  Post({
    @required this.userId,
    @required this.title,
    this.documentId,
    this.imageUrl,
  });

  ...
  // Add the document ID to the post model when serialising.
  static Post fromMap(Map<String, dynamic> map, String documentId) {
    if (map == null) return null;

    return Post(
      title: map['title'],
      imageUrl: map['imageUrl'],
      userId: map['userId'],
      documentId: documentId,
    );
  }
}
Then you have to go to the FirestoreService and update everywhere you make use of the fromMap function and supply the documentId as well.
// Change
Post.fromMap(snapshot.data))

// TO
Post.fromMap(snapshot.data, snapshot.documentID))
While we’re in the FirestoreService we will create a new function called deletePost where we will get the document by id and call delete on it.
class FirestoreService {
  ...

  Future deletePost(String documentId) async {
    await _postsCollectionReference.document(documentId).delete();
  }
}
Next up open the HomeViewModel and we’ll add our delete post business logic. We want to first show a dialog that asks if the user wants to delete the post. If the user says yes then we call deletePost on the firebase service.
class HomeViewModel extends BaseModel {

  ...
  Future deletePost(int index) async {
    var dialogResponse = await _dialogService.showConfirmationDialog(
      title: 'Are you sure?',
      description: 'Do you really want to delete the post?',
      confirmationTitle: 'Yes',
      cancelTitle: 'No',
    );

    if (dialogResponse.confirmed) {
      setBusy(true);
      await _firestoreService.deletePost(_posts[index].documentId);
      setBusy(false);
    }
  }
}
This is the function we’ll call when a PostItem remove icon is clicked. Open up the PostItem class and add a new parameter into the constructor. A Function called onDeleteItem.
class PostItem extends StatelessWidget {
  final Post post;
  final Function onDeleteItem;
  const PostItem({Key key, this.post, this.onDeleteItem}) : super(key: key);

  @override
  Widget build(BuildContext context) {
    return Container(
      ...
       IconButton(
          icon: Icon(Icons.close),
          onPressed: () {
            if (onDeleteItem != null) {
              onDeleteItem();
            }
          },
        ),
      ...
    );
  }
}
Inside the IconButton onPressed call we’ll check if the function is supplied and then execute the function. Go to the HomeView and supply the onDeleteItem function and call deletePost on the model and pass in the tapped index.
ListView.builder(
  itemCount: model.posts.length,
  itemBuilder: (context, index) => PostItem(
    post: model.posts[index],
    // Add the callback function to delete the post
    onDeleteItem: () => model.deletePost(index),
  ),
)
Run the code. You’ll see the app start with the list items you’ve added. If you click on the ‘X’ you’ll get a confirmation dialog. Press yes and you’ll see the item deleted. That’s it for delete functionality.
Update a Post
The last part we’ll cover is updating a post. The way we’ll implement this functionality is by navigating to the CreatePostView and passing it a Post to set as the starting data. When we click save we’ll check if we’re editting or creating a new post. Based on that we’ll call either update post or add post. We’ll start off with the work in the FirestoreService. Create a new function called updatePost that takes in a Post. This will get the post using the documentId and then call updateData and pass in the post.
Future updatePost(Post post) async {
    try {
      await _postsCollectionReference
          .document(post.documentId)
          .updateData(post.toMap());
      return true;
    } catch (e) {
      // TODO: Find or create a way to repeat error handling without so much repeated code
      if (e is PlatformException) {
        return e.message;
      }

      return e.toString();
    }
  }
Then in the HomeView we’ll add a GestureDetector to the PostItem where we will call model.editPost and pass it an index.
// This code is int the HomeView where we're building our list
 ListView.builder(
    itemCount: model.posts.length,
    itemBuilder: (context, index) =>
        // Add a gesture detector to detect when a user taps on this item
        GestureDetector(
      onTap: () => model.editPost(index),
      child: PostItem(
        post: model.posts[index],
        onDeleteItem: () => model.deletePost(index),
      ),
    ),
  )
Open up the HomeViewModel and add the new editPost function that takes in an integer index. In the editPost function we navigate to the CreatePostViewRoute and pass it the post we’re tapping on.
class HomeViewModel extends BaseModel {
  ...
  void editPost(int index) {
    _navigationService.navigateTo(CreatePostViewRoute,
        arguments: _posts[index]);
  }
}
Now we have to update the router to make sure that post is passed into the CreatePostView. Open up the router.dart file. For the CreatePostViewRoute case we’ll cast the arguments to a Post object and pass it to the view.
Route<dynamic> generateRoute(RouteSettings settings) {
  switch (settings.name) {
    ...
    case CreatePostViewRoute:
    var postToEdit = settings.arguments as Post;
    return _getPageRoute(
      routeName: settings.name,
      viewToShow: CreatePostView(
        edittingPost: postToEdit,
      ),
    );
  }
}
Open up the CreatePostView file and add the new parameter to pass in the Post. We’ll call it edittingPost and it’ll be of type Post. We will also make use of the onModelReady callback to set the titleController.text equal to the title passed in and then also call setEdittingPost on the ViewModel.
lass CreatePostView extends StatelessWidget {
  final titleController = TextEditingController();
  final Post edittingPost;
  CreatePostView({Key key, this.edittingPost}) : super(key: key);

  @override
  Widget build(BuildContext context) {
    return ViewModelProvider<CreatePostViewModel>.withConsumer(
      viewModel: CreatePostViewModel(),
      onModelReady: (model) {
        // update the text in the controller
        titleController.text = edittingPost?.title ?? '';

        // set the editting post
        model.setEdittingPost(edittingPost);
      },
      buidler: ...
    );
  }
}
Then we can finally update our business logic for this functionality. The first thing is to add a private variable that will hold the edittingPost and an accompanying function that allows you to set it from the outside. Then we’ll update the addPost function to check if we’re editting or not, where _editting will be determined by checking if the post is not null.
class CreatePostViewModel extends BaseModel {
  Post _edittingPost;

  void setEdittingPost(Post post) {
    _edittingPost = post;
  }

  bool get _editting => _edittingPost != null;

  Future addPost({@required String title}) async {
    setBusy(true);
    var result;
    if (!_editting) {
      result = await _firestoreService
          .addPost(Post(title: title, userId: currentUser.id));
    } else {
      result = await _firestoreService.updatePost(Post(
        title: title,
        userId: _edittingPost.userId,
        documentId: _edittingPost.documentId,
      ));
    }
    setBusy(false);

    if (result is String) {
      await _dialogService.showDialog(
        title: 'Could not add Post',
        description: result,
      );
    } else {
      await _dialogService.showDialog(
        title: 'Post successfully Added',
        description: 'Your post has been created',
      );
    }

    _navigationService.pop();
  }
}
And that is all the CRUD functionality using Firestore worked into Flutter. Run the code now, tap on a post item, edit it and press the FAB. When you get back to the list you’ll see it’s updated (Real time for the win!). You can delete that post and add more.
That’s where we’ll stop this tutorial. The code in production is usually a lot less, I’m being verbose here to accomodate the followability of the tutorial. I know that’s not a word but you know what I mean. I’m also leaving logging out of this series to keep it focused on Firebase only. I’ll make a separate video using the app we’re building here to add monitoring functionality to the app to speed up development and help you in fixing bugs that might appear. Thanks for following a long, these tutorials take time to condense into a meaningful set of instruction that can apply to the real world but also doesn’t go too far off the the topic. I really appreciate you reading and watching, I look forward to next week.
- Dane Mackier