Build your flare animations and add interaction to it using SmartFlare.
Remember that awesome tutorial i wrote about my little experiment with interactive Flare Animations. Well … I published a package that turns everything in that tutorial into ~60 lines of code. Crazy right, let’s dive in.
Why make SmartFlare?
I wanted a way to remove the massive amounts of boilerplate code in Flutter that would be needed to produce a highly animated interaction. Something like a Floating action button that pops out an actions toolbar, stars and squares that fly out of it, and a pulse animations behind it. Better to show than to explain. Check the file here.
When I started that experiment that I documented in my the tutorial I realised all the code I’m writing can be put into a small package. As I was writing I started working on the smart_flare package. I was hoping to finish it up before I release the tutorial so I could announce it at the end of my tutorial. One of the readers even mentioned the solution I was thinking of.
Isn’t it easier to use a stack with on the lower layer the animation and then on top of that container with onTap events. — mccidi games
The internals
The SmartFlareActor takes in a width, height and a filename. These are the required parameters to get the Actor to display the animation in its design state. Smart flare places the FlareActor in a stack and overlays Container widgets wrapped in GestureDetectors to create the interactive functionalities.
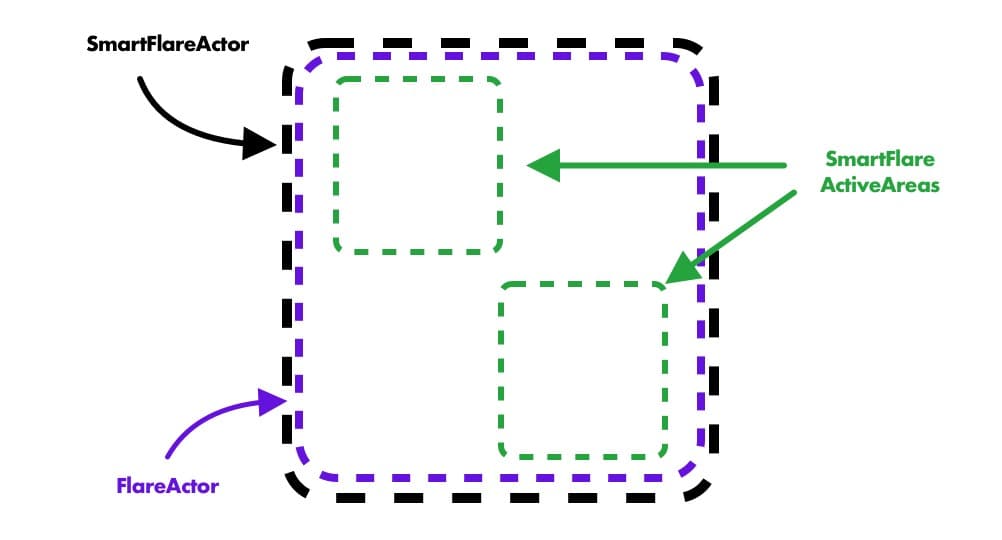
The SmartFlareActor can be given a list of ActiveAreas and it will use that to determine it’s animations to play. An Active area has the following parameters (and more):
- area: A rectangle that defines the touchable area (relative to your widget, starting at 0,0)
- animationName: The animation to play when tapping the area
- onAreaTapped: Function to call when area is interacted with
- debugArea: When true, draws overlays of the interactive areas.
How to use it?
Well let me show you. Clone this repo, go to 003-smart-flare and drag the start folder into Visual Code. If you run and you see the animation button at the bottom then you’re ready to go. Nothing will happen just yet.
We’ll start by looking at what we want to achieve. We want to cover our animation with the following touch areas.
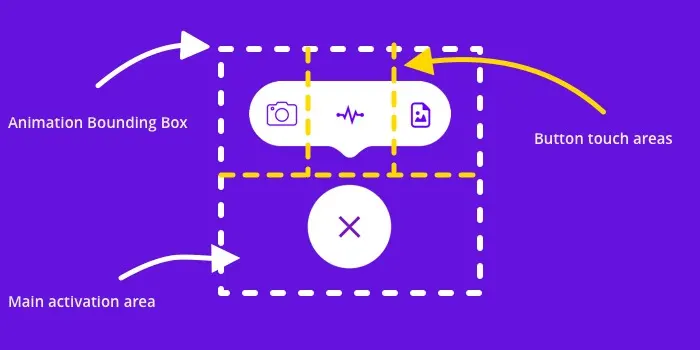
Toggling our animation
Let’s start by giving the lower half of our animation an active area and giving it states to toggle between. An ActiveArea allows you to supply a list of animations to cycle through or a single animationName, but not both. We’ll create an ActiveArea and give it the activate/deactivate animations. The area will take up the bottom half of the animation.
// Create our list of active areas
var activeAreas = [
  ActiveArea(
    area: Rect.fromLTWH(
      0,
      animationHeight/2,
      animationWidth,
      animationHeight/2),
      debugArea: true,
      animationsToCycle: ['activate', 'deactivate'],
      onAreaTapped: () {
        print('Button tapped!');
      })
];

// Update the SmartFlareActor
SmartFlareActor(
    width: animationWidth,
    height: animationHeight,
    filename: 'assets/button-animation.flr',
    startingAnimation: 'deactivate',
    activeAreas: activeAreas
  )
After adding this and saving you should see something like the image below. Keep in mind I’m dealing with some HotReload issues so if the animation gets stuck just pres the refresh button next to stop. It always fixes it up.
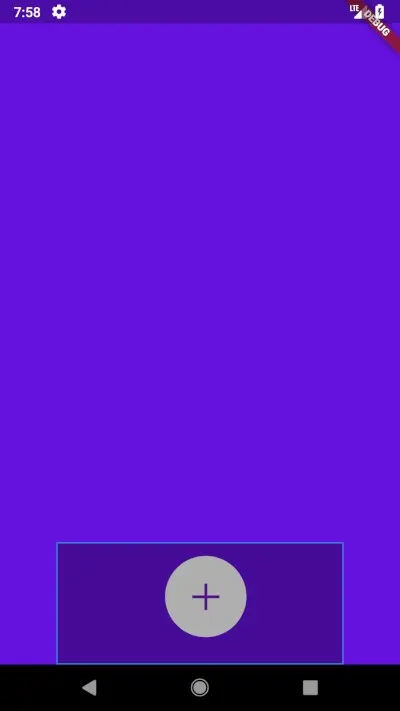
Tapping this area should give you a nice animation :) . Much simpler to handle, isn’t it. Let’s move on. From the layout image above we want to create three active areas of width animationWidth/3 and height of animationHeight/2, the left positions will change, and top will stay 0. Lets add our first one.
Create an Active area at top:0 and left:0 with the dimensions above. Give it the animation name camera_tapped and and set the debugArea to true.
// Add Active area into active Areas

ActiveArea(
  area: Rect.fromLTWH(0, 0,
  animationWidthThirds,
  halfAnimationHeight),
  debugArea: true,
  animationName: 'camera_tapped'),
Once you save you’ll see the debug area pop in. If the animtions freeze up (which it sometimes doesn on hot-reload) then just press the refresh button next to your stop button in Visual Code or restart the app if that doesn’t work. This only happens when hot-reloading (sometimes).
And it’s that simple. At this point we can play the camera_tapped animation even when the toolbar has been deactivated, and we don’t want that. ActiveAreas also take in a guardComingFrom list of strings. This list will block the tapped animation , if the previous animation played is in this list. Because we don’t want the camera_tapped animation to play when it’s been deactivated. We will supply the guardComingFrom list with ‘deactivated’.
 ActiveArea(
  area: Rect.fromLTWH(0, 0,
  animationWidthThirds,
  halfAnimationHeight),
  debugArea: true,
  guardComingFrom: ['deactivate'],
  animationName: 'camera_tapped')
Save, do a refresh using the refresh button and you’ll see the guard in action. Close your animation and then try to tap the camera_tapped container. It shouldn’t be playing at this point, unless it’s open.
Now all we have left is to copy this area and move it to the right with different animations and we’re done. Add the last two active areas into your and you’re all set to go.
ActiveArea(
  area: Rect.fromLTWH(
    animationWidthThirds, 0,
  animationWidthThirds,
  halfAnimationHeight),
  debugArea: true,
  guardComingFrom: ['deactivate'],
  animationName: 'pulse_tapped'),

  ActiveArea(
  area: Rect.fromLTWH(
    animationWidthThirds * 2, 0,
  animationWidthThirds,
  halfAnimationHeight),
  debugArea: true,
  guardComingFrom: ['deactivate'],
  animationName: 'image_tapped'),
Wrapping Up
That’s the basics of the package. I’m building this because it’s the kind of functionality that I want to see from an animation library, and it’s the kind of simplicity I expect when taking up modern animation libraries or new Frameworks.
Please follow me to keep following this experiment I’m going to be taking on some more issues with this implementation. Some claps would also be cool you know.
I just want to mention that if you’re not using 2Dimensions Flare then you should look into it. I have some very intriguing plans for this package and Flare is going to be a major part of it.
I had a couple of comments about accessibility over on reddit. After looking into it I see that flutter provides a Semantics Widget to help you with screen readers so I’ll be adding that in as well. Any additional accessibility things I can look in to? Let me know please.
Can I help you build this awesome package?
Of course you can! It’s here on github I published it about 2 hours ago as of writing this tutorial. There’s no code guidelines yet, not separation of widgets or functionality or anything like that. I just wanted the idea out there. Here’s a list of things I will be adding, starting after I finish video on this little experiment for my YouTube channel.
Single Purpose actors
Simple to use single purpose actors that makes basic animation states and interactions easier to implement.
- CycleFlareActor: Supply this actor with a width, height, filename and a list of animations to cycle through and as you tap it plays one after the other
- PlayOnHoldActor (still working on the name): Supply this actor with a width, height, filename a single animation or list and as you hold down on it, plays the animation at a fixed pace. Additional parameters can be given to reverse on release or doubleTap to play faster.
More / Better Guarding
Add a parameter to guardGoingTo. If your animations look funny going from one state to another then you’ll probably want to guard against it. So I want to have a parameter similar to guardComingFrom that will guard against going to certain animations.
Position placement using percentage / relative values
Placing and sizing our active area using percentages relative to the main animation size. For example left: 0.25, top: 0.25, heigth: 0.5 , witdh: 0.5 will place the active area in the centre of the animtation. This will make things easier for large full screen animations where you don’t want to use fixed values for positioning.
Debug all
Add a flag to the SmartFlareActor to set all active areas debug to true instead of always having to supply the areas for all the individual areas.
Accessibility
Add parameters to supply labels for screen readers
Sound
Certain animations sound better with sound so I’d like to add that option as well.
If you would like to contribute that would be super cool, tackle any of these on here. You can mail me at dane@filledstacks.com and let me know which ones you want to take on and I’ll make sure not to implement that. I’ll update the repo soon to make it easier to track.
That’s it for now. Please share, hand out some claps and check out the package. Any feedback is highly appreciated!


